Thursday, April 24, 2014

Where the Play Set Landed

After considering our options, concerns, and readers/friends' advice, we chose to put the play set on the side of our house further from the road to leave that more level area for other uses such as party tents in the future.  This relatively private corner has been the retreat I hoped it would be.  It feels like our yard got bigger now that we are utilizing that area as well. 

To set the structure up on level ground without digging up the whole area, Mike dug a trench at one end and built the set into the incline.  It looks great, is structurally sound (he assures me), and has been a great source of outdoor fun already!

Friday, March 28, 2014

Where should we put a play structure?

We've been spending some time lately trying to select the best location for our kids' outdoor playset.

Our yard isn't huge.  We have great views of trees and expansive yards and common areas around us, and it all feels both open and private, but the fact is our property itself is on the conservative side.

We recently decided to get a play structure for the kids' 4th birthday present.  One of our favorite parks is a five minute drive away, but there are no parks within walking distance.  To make the most of our home and warmer weather play time, we are going for it.

After discovering that new ones of good size and quality run upwards of $3000, and knowing that having Mike build one isn't much cheaper and would likely cut into a lot of spring and summer play time (that was a nice way of putting it, wasn't it?), I started hitting Craigslist.  We were thrilled to find a good deal on this guy and got the ball rolling last weekend:
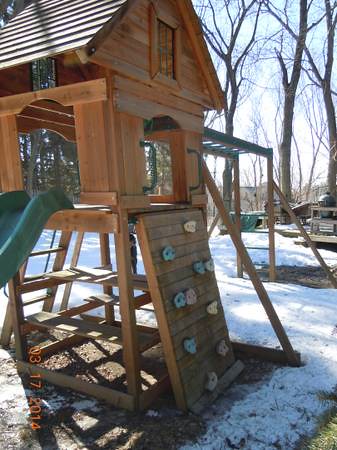
Selecting Child's Play Structure Location

Mike took a look and gave a deposit, and he will be going out to take it down and bring it home in pieces this weekend.  The next step is the one that's causing me to stare out windows and wander our yard quite a bit.  Where should we put it?

Selecting Child's Play Structure Location

This area above is what we consider the convenient one.  It's the flattest part of our yard, so leveling will be minimal.  It's right behind our driveway, so one kid could play there while the other swings and slides--no location compromise to be made during play time.

Selecting Child's Play Structure Location

Above is another view of that same spot.  The trouble with it is it's closer to the main road that runs alongside our subdivision (the SUV in the distance is just beyond it).  The farther from that, the safer I'll feel, but is the other end of the yard really that much safer?  And should it really concern me with relatively compliant four-year-olds who have never headed toward that particular road so far? 

That other end is below.

Selecting Child's Play Structure Location

The space to the left of the trees is a large common area where the kids can run around.  To the right is our neighbor's yard.  The foreground is our property where Mike would have to do some extensive leveling (and yes, that's snow--almost gone).  I like this more secluded space because it feels safer and just more pleasant.  But if one kid wants to do sidewalk chalk on the driveway while the other wants to swing, I would have to position myself pretty strategically to keep an eye on both. 

The third option is right outside our family room window (kind of in between these two locations).  It would break up our backyard quite a bit, especially since we hope to put in a patio next year right beside that.  But being able to watch the kids from the couch someday might be nice...

Mike is going to get out there with stakes and string so we can really visualize these options and the work that could go into both.

The other question that we ponder is ground cover. Should we go all the way and build a play area with wood chips/recycled rubber for safety and easier lawn mowing?  We're leaning no on that one, but I could be swayed.

What do you think?  If you put up a structure in your own yard, what area do you recommend for us?  Are there factors I'm not even considering? 

Quite likely, we'll just be glad to have swings and a slide and so on, regardless of of what location we choose for the play structure!  I can't wait to share this news with Michael and Sophie.  They might get as excited as I am.

See the update here!

Wednesday, February 26, 2014

A Laundry Room Updated with a Drying Station is Loads of Fun!

With a few small projects we were able to improve the functionality of our laundry room.  We removed a wallpaper boarder, painted, rearranged cabinets, and added a clothing drying station.

The title of this post was stolen from the sign that now hangs in our laundry room.  Gotta love a little ironic humor when you're spending yet another Saturday knee-deep in towels, sheets, and jammies.

Laundry Room Drying Station
A friend of mine sells these Life Expression signs.  Hosting make-and-take parties has become a bit of a hobby for the rest of my circle of mom friends.

The irony of the title of this post also lies in the "fun" Mike was having when I was painting this sign at a friend's party several months ago.  He spent that same afternoon caring for our kiddos and turning this:

Laundry Room Drying Station
Not so bad, but not functional for us.
into this:

Laundry Room Drying Station
Not super exciting, but it works for us.
He took down the adorable sock border (okay, if this was 1995, I would probably like it...but it's not) and painted before we moved in.  Still, the hook-ups for the washer and dryer needed to be switched so their doors would open away from each other allowing laundry to be moved along easily.  Since the doors of those dang front-loading washers need to be kept open when not in use to prevent that mildew smell (regretting my choice to take that on now--oh, well), having the washer against that wall also keeps the walkway clear of that usually open door.

We also needed a space to hang-dry clothes, so Mike took out the two single cabinets, shifted the two double ones all the way down to the left wall, and hung a bar in the remaining space over the sink.

Laundry Room Drying Station


Laundry Room Drying Station


The space is small, but the drying station and new cabinet arrangement is working well for us now.  

I mean, the room doesn't fold our socks or anything, but it'll do.

Tuesday, February 18, 2014

Local Artists in a New Locale

Years ago in the old playroom, I tied a length of twine to two eye-hooks and hung the kids' artwork from it with tiny clothespins.  It was a solution that cost next to nothing (had to buy the clothespins), and I loved the look of our children's art display..

Children's Art Display

It's taken me a bit to figure out where and how I would hang the kids' artwork in our new place.  I settled on a wall of the playroom and considered taking the old look up a notch.  I noticed that even their child care center has given in to the sleek functionality of art hanging from wire curtains rails.

Making do with what we have is the name of the game right now, though, and we have several curtain rods that we brought from the old place (re-hung some older blinds for our renters), and plenty of curtain ring clips to match.

Children's Art Display

Another solution that cost next to nothing and I love like the look!

Children's Art Display


This new children's art display works for me!

Friday, February 7, 2014

Combating the Brass: Fireplace

This house came with a lot of brass--brass cabinet pulls, brass light fixtures, brass faucets--but we see those as relatively quick and affordable DIY opportunities.  While we would love to make those changes immediately, we are taking a room-by-room approach to most projects, focusing our funds and energy these days on our main living areas.

So far our interior brass doorknobs and the kitchen cabinet pulls have been replaced with oil-rubbed bronze.  Our bathroom faucets and our shower surround will have to wait until they climb up the priority list, however.  It could be a while.

Updating 1990's Brass

Happily some more brass did bite the dust this past weekend.  Our fireplace went from this:

Updating 1990's Brass

to this:

Updating 1990's Brass


Mike used a brush-on paint designed for high heat.  I took the doors off and cleaned them.  That was the extent of my contribution beyond the ideas and shopping I usually provide.  He then removed the glass from the frames, painted two coats on all of the visible edges, and re-installed it all.

We were unable to find new handles that fit the doors at our local hardware store, so Mike painted the brass parts of those as well.  We'll probably look into ordering some other ones later on.  We'll see.

Updating 1990's Brass

We're surrounded by future projects that will require a lot of time and money to take on.  Knowing how satisfying these smaller changes can be means all the brass tempts us to drop a little cash and put in the weekends sooner rather than later.  Still, we believe the impact will be more satisfying and the funds will grow faster if we hold off for the most part.

So I'll live with bits like this...
Updating 1990's Brass

...for now.  But I look forward to writing "Combating the Brass: Everything Else" one day.

Then I'll start the "Combating the 1990's Tile" series.

Monday, February 3, 2014

A is for Apple - Create a Simple Child's Room Mural

I posted this on Shared and Doubled (our family blog) earlier today, but since it is also about fixing up our house, I thought I would post it here as well.  


Between the kids' nap last Sunday and their playing pretty peacefully together on the morning of a snow day (we've had a bunch this year), I was able to knock this out!

Child's Room Mural


This same artwork was in the kids' playroom in the old house, of course.  It was inspired by a photo I saw in a Pottery Barn catalog that had the same concept on the wall of a nursery.  I didn't keep the catalog, and this is the only photo I could find online of the inspiration.  You can see the bird, but you'll have to trust me that the apple and caterpillar are up there, too.


It's funny to think back to making this for the old playroom before the kids were born.  We bought the frames with a gift card from the shower on the same shopping trip that I bought the pants I wore to the hospital.  I painted the chipboard letters and craft paper backing in our old basement with no distractions at all, aside from a big ol' belly.
Child's Room Mural 
Child's Room Mural
I sketched the stencils with my feet up on the couch, the way I spent a lot of afternoons back then.  I thought I kept the cut-outs just as keepsakes. Turns out it was so I could do it all over again!
I don't have a very vivid memory of painting the design in the old house (pregnancy brain?), but I'm sure later on I'll remember the kids playing around me this time around as I tried not to mess up.  Mike pointed out before I began that we have no more yellow paint for the playroom, so touch-ups would not be an option.  The pressure made me feel all Michelangelo.
Child's Room Mural
I believe I will also recall Sophie telling me I'm very good at painting and asking, "When I grow up to be a teacher, can I paint on the walls like you?"  That teacher thing came 100% from her, despite my suspicion that she has it in her.  I told her yes, by the way. 
Child's Room Mural
Above is a photo I took from my painting perch on top of the toy shelves.  Later I discovered that I dripped paint in Sophie's hair.  Better there than on the walls!
While it was certainly easier to paint with two munchkins peacefully rolling around in my belly, this was admittedly more fun and rewarding, especially when Michael came down from his nap to see what I had started and declared it a "Great idea!" 
Child's Room Mural
Sophie exclaimed that my work was "just beautiful" when it was done.  Best patrons ever.
Mike and the kids also added a shelf to the kitchen area this weekend.

Child's Room Mural

Child's Room Mural

Child's Room Mural
I can't believe how much better this playroom feels to me now.  It's all warmed up with memories of preparing for these two, of infants crawling over my legs, and of a couple of toddlers stumbling around gumming teethers.  We're filling the space now with games of Candyland and Memory and all sorts of imaginative fun, of preschoolers making observations and playing contentedly by my side.

Thursday, January 30, 2014

Valentine's Day Mantel 2014

Valentine's Day Mantel

For last year's Valentine's Day shelves I put out family wedding photos.  While I liked that concept, I don't wish to try it again until I can replace or paint the frames. Since my goal was to get this mantel done during one snow day nap time, I knew the wedding photo frame project was out for this year.

Valentine's Day Mantel

However, after I spent a good chunk of that a snow day nap time arranging and rearranging a few Valentines-ey items (including the above vase that I painted at one of those paint-your-own-pottery places back in August), I came to the conclusion that some minimal crafting was in order.

I needed something of substantial size and visual weight to anchor my little accessories.  Hanging some decoration on a picture frame with paper or fabric inside the frame seemed like the most time-efficient plan, and the perfect fabric came to mind...

To preserve their potential to be easily sewn into pillows one day, I cut off a sleeve from one of Mike's old sweaters and cut up the middle seam.  Don't worry, this is one of several sweaters he handed off to me long ago, this one having grown wider and shorter over time as sweaters tend to do.  Someday I'll make those sweaters into pillows...or Christmas stockings...or vase covers...or...you can see why they were still sitting untouched in my fabric bin.

Valentine's Day Mantel


Valentine's Day Mantel

I used the cardboard backing from the frame as a guide and trimmed around it leaving at least .5" around the edge.

Valentine's Day Mantel

Tugging the the fabric here and there, I made sure to get the cable knit lines straight.

Valentine's Day Mantel

I can see a lot of other uses for this concept--Christmas decor, photo matting, earring hanger (another project on my list, of course).  While I love cable knit enough to see it alone as nearly acceptable decor...

Valentine's Day Mantel

...adding that heart made our first Valentine's Day mantel in our new house complete!  Except it seemed a little out of scale for the fame.  The ruby-red slipper glitter was also more sparkle than I tend to use, so I swapped that out for the letters from one of last year's crafts to tone it down a tad (I just stuck them on with tape).

Valentine's Day Mantel

Is it bad that when Mike noticed the sweater fabric and teased "Is that because it's a symbol of your loooooove for me?" that was the first time the symbolism occurred to me?

Valentine's Day Mantel


Crazy, because now it strikes me as all warm and husband-like and swoony. Happy accidents!